March 27, 2019

Learning Kentico: Linking JavaScript files to pages

by , in
Just a quick post about something I learned new today.

I didn't know that there's  a Javascript web part that you can use to easily link it to your page and this can just be done in the Portal. So cool!

First, you will need to create your own javascript file by going to Development -> Javascript files and click Create. 


create javascript in kentico


Then go to the Page where you want to add a Javascript and select Javascript web part. Click configure web part and in the Linked Javascript section, select the javascript that you just created.

linking javascript file to pages

You also have the option to select where it should be located in a page like in a start up script, beginning of a page and header section. And of course, you  can always add in-line javascript also.
March 22, 2019

Learning Kentico: Device Profiles and Device Lay-outs

by , in
I've finished reviewing the 1st Developer course (K10) last week and now I'm into the 2nd one. 

And yesterday, I learned about Device Profile which is part of the optimizing websites for mobile devices topic. (not discussed in K11 dev course)

It is also something that I always see when using the Preview option and it's good to know more about this adaptive design approach in Kentico. 

Kentico Device Profile
Device Profile

To set-up a new profile
,  just go to Development applications -> Device Profile and supply the necessary fields or add a macro rule like current device max screen size should be between 0 and 768 pixels (width).

Device Profile
Add New Device Profile 
Once done, if you go back to the list of Profiles - you will see a smart tip that the system checks the profiles from Top to Bottom. You can just rearrange this.

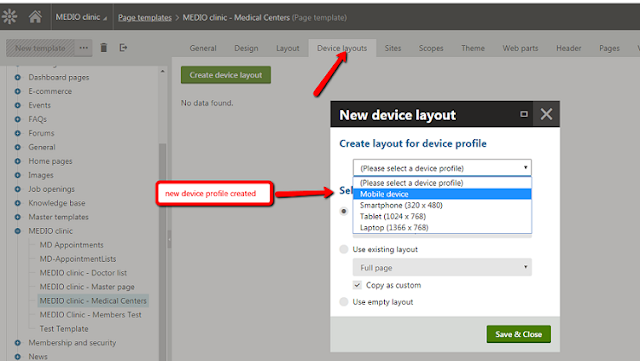
To use this profile, you will need to make use of the Device lay-outs found in the Page Templates. (so that's what this tab is all about?)

Device Lay-out
Use Device Lay-out

Then select to copy the default device profile and just edit it later (for how the lay-out will be)

Then go to the Pages application and select the page where you want the changes will be when viewing different devices. Like if you do not want the menu to be showing in the device profile you created (mobile device). You can adjust the CSS list menu web part and add a macro rule.

using macros for web parts
Using Macros for Web Parts

If you want  to learn more about this feature, you can check-out Kentico's documentation about Developing websites for mobile devices.

On another note, the lay-out mapping found in the Device Profiles looks interesting also. Hmmnn..

March 11, 2019

Learning Kentico: Online Marketing Essentials (the things I love)

by , in
Howdy! Happy Monday everyone! Hope you are all doing well and had a wonderful weekend.

New update for today! I have briefly mentioned in my previous post that I have taken the opportunity to check-out the Online Marketing Essentials course also.

I don't often go to this section in Kentico because most of the support requests I received from our clients are site updates, bug fixes and help request on how to do this and that. So I was surprised to know that there are a lot of very nice features Kentico has developed that any Digital Marketers/Marketing Manager/Sales Manager in a company would surely love or find it very helpful.

Below are just some of the features: 

1. Marketing automation - very useful feature which you will truly love. You can set-up different steps for your marketing emails like if you want to send:

 a. an abandon cart email - email triggered when someone starts to check-out but doesn't finish
 b. browse abandonment email - trigerred when someone on your email lists visits a product on your website but doesn't check-out
 c.  we've missed you email - known as winback campaign, when someone doesn't come back to your store after 60 days or so, so you will send an email with a coupon to bring them back

marketing automaticon
marketing automation

2. Contact Mapping in Forms 
- I haven't noticed this since I was checking forms but it's good to know that there's this feature that you can use for your marketing activity. You can also create custom fields here like if you want to add a Bonjoro (an app you can use to send personalized videos to your contacts/leads). 

contact mapping in forms
Contact Mapping in Forms


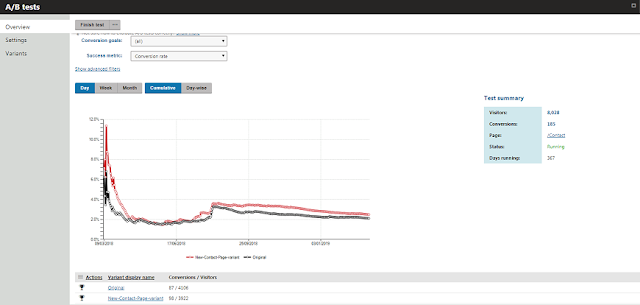
3. A/B Test Feature (both in Pages and in Email Campaigns)
- a great feature that helps you optimize your website's peformance. Tests which will help you see which variants bring the best returns. :)

In Pages application, you can find this in the Analytics tab then select AB Tests.
See results example .

A/B test in Kentico

While for the email campaigns, just go to Email Marketing, select the email feed/campaign you want to test, edit email (click the pencil icon) and create A/B test.

A/B Test in Email Campaigns
Create A/B test in Email Campaigns

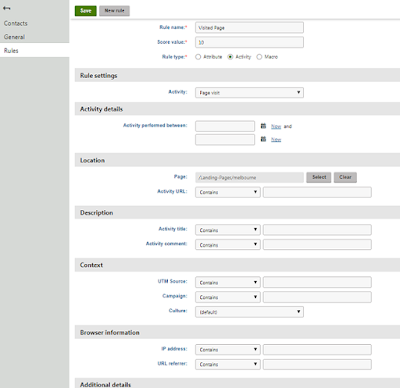
4. Lead Scoring - cool feature to analyze your visitor and identify the customers who are willing to spend money (hottest lead) on your product. :)

You can set-up rules like when they provide email address, considers large purchase and assigned score values. You can recalculate this and view the activity that lead to the scores of your contacts and find the most promising leads. :)

Lead Scoring Kentico Feature
Lead Scoring

I think that's it! Nice features right? Kentico is truly your all-in one CMS, E-commerce and Online Maketing platform. If you want to know more details about this or the rest of the Online Marketing features, why don't you check-out the Kentico's Online Marketing course also. 

Bonus:  Another thing that I learned. When setting up email campaigns using macros and your subscriber didn't provide a first name, this will not look good on your email. So you can set-up a condition to this or a default name like "subscriber".

This can be done by selecting the macro and go to the code tab. Then insert your condition like: IfEmpty(FirstName, "subscriber", firstname). Check-out video below for more :) 


Next, I will review the two developer courses and hopefully resolved the macros exercises. :)
March 06, 2019

Learning Kentico: Content Admin Essentials (the small things)

by , in
Hello March! How are you? 

More than 15 days have passed since my last blog post eh? Yeah, I'ven been focusing reading and learning a lot about Kentico stuff. I checked out their Kentico Advantage site, their webinars (Kentico 10-12) and some other Youtube helpful videos including the tutorial videos prepared by a former colleague. Getting overwhelm with too much information eh? But I'm trying to manage all those stuff.  

And as part of my review and effort so I can really digest all the information. I went back to learning the basics also. I take the opportunity to check-out the Kentico Content Admin Essentials course. Although I'm already familiar with the Kentico Administration interface since version 7 (now it's Kentico 12). I just really wanted to check what's inside it. (if there's something that I missed or didn't know about

And yes, there were small things but important ones that I missed or should I say overlooked or didn't just bother about it before. 

1. The Compare Option in Editing Multilingual content - I didn't know that there's a handy compare option where it easier for you to update changes and you can even compare it horizontallly or vertically. I surely overlooked this feature. I remember I was working on a website of a client before and I was switching back and forth to different cultures. 

compare culture content


2. Anchors in Text Editor - I always get a request to create anchors and I would always do this in the source option. But didn't know that there's actually an anchor feature where you can use when you set the HTML editor toolbar to Full. Hehehe. 

html editor, anchor

3. The colors in the Language Status Overview - when you go to the listing and click on languages, I didn't know that there's meaning to the background colors of those flags in each culture

green -  page is published 
red - page is not published 
orange - published but outdated

language status


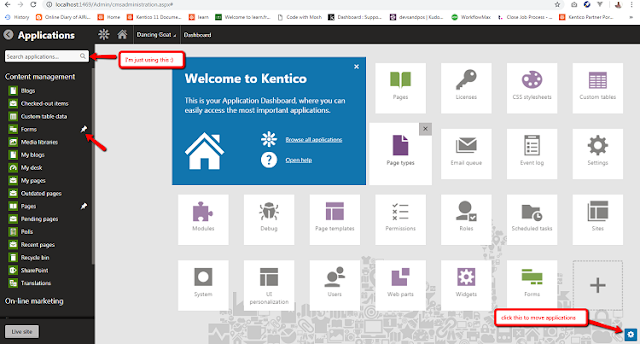
4. The pinning and managing of applications in the Dashboard - yeah this one is very basic, but I didn't really bother about this because I always have the option to search apps in the Dashboard by clicking the Kentico flower or logo (full list of apps)

If you want to configure your dashboard, you can just make use of the pin icon, the gear icon (found at lower right) and drag and drop apps etc. 

Kentico Dashboard

So that's it! But if you are new to Kentico or will be working as an Editor or an Admin I would suggest to really get the Kentico Admin Essentials course. The ones I discussed where my "small things" version only. But inside the course, you will really learned a lot of GREAT STUFF like:

Kentico Administration 
Website Structure 
Editing content 
Storing Files 
Creating New Pages 
Page Design 
Online Forms 
Workflow and Versioning

And their quizzes for each topic? Oh, I really loved them. It's tricky and you will need to be very careful. It would be good if you get the answers the first time. But if not, you can always retry. 


Bonus Small Thing: The Screen Lock 


This one is not discussed in the course but this is very helpful to all editors and admins. You will encounter this screen lock message all the time and quite annoying that you have to always click Cancel. To disable this, just go to Settings -> Security & Membership - Protection and uncheck the Screen lock option. Or you may refer to the screenshot below. :) 

how to disable screenlock in kentico

Next: I will check the Online Marketing Essentials :)


Post Top Ad