Showing posts with label Kentico. Show all posts
July 11, 2019

Learning Kentico: Restoring Deleted Web Part and Making a Copy of Page Template

by , in
Fort the past 2 weeks, I received two requests from client of trying to create a page based from an existing template but has only a slight difference on the page section. 

But as you know, if that template is being used by the other pages or subsites - the changes you do on that particular template will affect the other pages. So I needed to make a copy of it.

Copying Page Template


All you need to do is go to the Page Templates section -> Select the template that you want to copy and click the Other Actions menu (three dots) and click Clone Template

Once done, you can now make changes to that template like removing a particular web part. Then go to the Pages application, select the page you want to update and choose that clone template you created. 

Cloning Template, Copying Template, Kentico
Cloning Template

Of Restoring Deleted Web Part


But before that, I first thought of updating the page in the Design tab because the client was only requesting to remove a section (like the Newsletter form). 

The newsletter form appears in the sidebar of a page and it is being used in another page also. I didn't check that the two pages are actually using the same template. I thought they are different and it will not affect the other pages. 

But I was so careless. I didn't take note also of the configuration of that custom web part. Shucks! I was thinking, this just an easy peasy job - no need to do that. I was so confident that the other page will not be affected. (I know right! Lesson learned! Don't delete immediately, just HIDE - take note Alma)

So I tried to check it in the Recycle bin but it can't be restored from there. I checked the Versions option found in the Properties tab of the Page but it looks like it will restore the content changes only (not the web parts being added and its setting). 

I checked some resource online (Kentico Devnet) and they said that it can be restored if you have an Object versioning enabled. But it looks like the client's site doesn't have that and comparing from the Documentation of Object Versioning I didn't seen an option for Template Versions in the Design Mode. My gosh, what to do? 

Kentico Page Design Mode
Design Mode


Seems like the only solution left is to add it manually and I don't have an access to the code files. I don't want to disturb our developers because it's already late at night in their country (New Zealand). 

So I thought of adding it myself. I checked the Web Archive Org on how the newsletter form looks and when I tried adding the newsletter form web part - it showed the default newsletter sytle. I changed the web part container to div element and it showed the style that matched the site's look but it becomes two form now.

Newsletter Form
Newsletter Form


So I needed to check it in the Page Templates section and see the code and while I was there, I saw the Versions Tab. And viola! It is where that you can restore it. Thank goodness! Issue resolved now. Yay! That's the fastest way! 

So remember this guys, when you want to restore to the previous Page Template version - just go to the Page Template Applications -> Version tab -> and select the Version you want to restore. :)  

Object Version (Page Template)


May 06, 2019

I tried but I failed

by , in
And so I have tried my luck in taking the Kentico Developer Exam last Friday but unfortunately I failed.

Though I know the chance of getting me not passing the exam is a bit high because some developers weren't able to do so on their first try but I just really want to get it over (in my head and in my mind). I also wanted to see how difficult it is and I want to move on with my training.

Kentico Certified Developer Exam
Kentico Certified Developer Benefits


But before the exam, I scanned some of my notes and reviewed the Developers Preparation guide from versions 9-11. I took the tests and below are my ratings. 

For version 9, I only got 48%
For version 10, I got 63% 
For version 11, I got 87.5%

Version 11 preparation guide is almost similar to version 10 that's why it's quite easy. So basing from from those results, I didn't get an average of a passing rating (70% above). But I still took the exam . I didn't want to prolong it anymore. I also want to make use of the free voucher I got because of the Developer's training my employer has purchased for me. 

The exam consists of 50 questions with single answer and multiple choice types. It is an open-book test. So you can open any resources you want (Kentico documentation, Macro browser, API references, Kentico Advantage or a Kentico site running etc) except for another person. Remember no cheating or sharing! You must take the exam individually. 

Though it would not require you to code but the questions are reallly difficult. Head knowledge and practical understanding of the product feature's and functionality are not really enough. You need to have practical experience and high-level familiarity with the product itself. 

But it's still quite a relief. Because finally, I did it! No more headaches about Kentico and constant dreaming and a bit of anxiety. Hehe. Now, it's time for me to move on and switch to different training. Another headache! Hehe. 

I will finish first my curriculum from FreeCodeCamp site and then continue my C# training (all courses). I want my learnings to be as fast as I can but I can only do so much. There are times that I get tired and sleepy also, got distracted and encountered a lot of road bumps. But as my developer friend told me, I shouldn't give up. (Now, I'm being so dramatic - I hate myself. Hehe. 

But honestly, I really hope that I will thrive in this. This is the only thing that I can think of that will help me and my family's situation turn around. I need to level up. Good luck self! Kaya mo iyan!

Kentico, I will get back to you after a couple of months or maybe a year. We will see. Hehe. Charot!

By the way, if you want to download the preparation guides for Kentico Developer's exam. Check-out the links below (K12 included, the latest version)

Kentico 9 Certified Developer Exam Preparation Guide
Kentico 10 Certified Developer Exam Preparation Guide
Kentico 11 Certified Developer Exam Preparation Guide
Kentico 12 Certified Developer Exam Preparation Guide


April 04, 2019

Learning Kentico: Alternative Forms

by , in
Just finished with the 2nd developer course (K10) and the last topic was all about Alternative Forms. 

Alternative Forms in Kentico are different versions of existing form lay-outs. 

I first learned about it when I watched the tutorial videos of a former colleague. There were two instances where he applied the Alternative Forms. 

First, in the Form application and the next one was in the Module application. The first one was not a surprised but the second one was like my AHA moments (one of those) also. He went to the Membership classes and edited the CMS_User table and added custom fields and make the other inherited fields hidden. Take note, it is a System Table or Object

Kentico Alternative Forms
Alternative Forms (System Objects)
And today, I learned two other ways where you can create an Alternative Forms. It is in the Page Types and Custom Tables. Cool! And I've seen the code name Filter when I checked an example for the Page types (see below). 

Alternative Forms in Page Types


According to Kentico, if you used that reserved code, the system automatically uses the alternative form that you created. Other code names are Insert, Update and NewCulture. Learn more from here

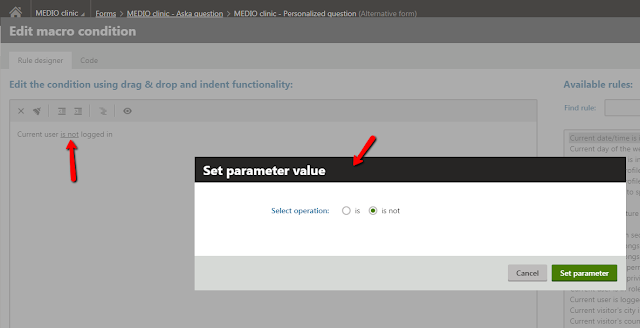
I have yet to try it but for now I just finished the Form Exercise of Creating Alternative Forms. :) I also learned that there's an Enabled condition field in the Advanced settings where you can use a macro condition and set parameter value. 

Kentico macro condition
Macro conditions (set parameter value)

Will continue with my review on the next training course! That's it for today! Short and sweet! Charot! Hehe. :) Happy Thurrrssssssssssday!
April 03, 2019

Learning Kentico: Workflows

by , in
When my employer first bought Kentico training courses, I was not one of those who got access to it. I wondered why. But I said to myself, perhaps he thinks I don't need it. Besides, I'm into Customer Support and I'm quite familiar with Kentico CMS already and I don't need the CMS training. All the more with the Developer's Training because after all, I'm not a developer. Hehe. 

But after a year, I think they see something in me or I showed interest thats why they bought training courses for me. And I'm really thankful for it. So here I am - blogging about my learnings. :)

And Learning Workflows is one of them. I've seen it. I had a discussion with it with a previous developer (back then when he was learning about Kentico) and I got excited to know a bit about it. It's like one of those AHA moment. When you finally know what it is and where it is configured. 

Kentico Workflow
Default Workflow

So for example, you want to create a Workflow where an Editor will review the page's content. You can do this by creating a Basic Workflow. 

1. Go to Configuration-> Workflow-> Create New Workflow 
2. Then Go to Steps -> Create New Workflow steps (like Editor Review) 
3. Then Edit the Step you just created -> Assign Role (like the site administrators will do this)
4. Go to Scope -> Select the Path where the workflow will be applied 

Note: Basic Workflow has default steps already which are Edit, Published and Archived so you'll just need to add the new step. You can apply workflows to individual pages, defined scope of pages or for an entire website. 

Kentico Workflow
Basic Workflow

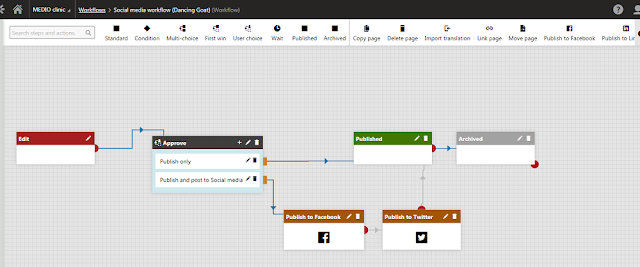
And for today, I learned something more. It's about the Advanced Workflows where there are special type of steps namely: Condition, Multi-choice, First-win, User Choice and Wait. Although I haven't applied them yet or haven't designed my own but I'm already lovin' it (as always, because I love Kentico so much! charot!)

Kentico Advanced Workflow
Advanced Workflow example

Anyway, if you are interested to learn more about Worfklows also, check-out this link
March 27, 2019

Learning Kentico: Linking JavaScript files to pages

by , in
Just a quick post about something I learned new today.

I didn't know that there's  a Javascript web part that you can use to easily link it to your page and this can just be done in the Portal. So cool!

First, you will need to create your own javascript file by going to Development -> Javascript files and click Create. 


create javascript in kentico


Then go to the Page where you want to add a Javascript and select Javascript web part. Click configure web part and in the Linked Javascript section, select the javascript that you just created.

linking javascript file to pages

You also have the option to select where it should be located in a page like in a start up script, beginning of a page and header section. And of course, you  can always add in-line javascript also.
March 22, 2019

Learning Kentico: Device Profiles and Device Lay-outs

by , in
I've finished reviewing the 1st Developer course (K10) last week and now I'm into the 2nd one. 

And yesterday, I learned about Device Profile which is part of the optimizing websites for mobile devices topic. (not discussed in K11 dev course)

It is also something that I always see when using the Preview option and it's good to know more about this adaptive design approach in Kentico. 

Kentico Device Profile
Device Profile

To set-up a new profile
,  just go to Development applications -> Device Profile and supply the necessary fields or add a macro rule like current device max screen size should be between 0 and 768 pixels (width).

Device Profile
Add New Device Profile 
Once done, if you go back to the list of Profiles - you will see a smart tip that the system checks the profiles from Top to Bottom. You can just rearrange this.

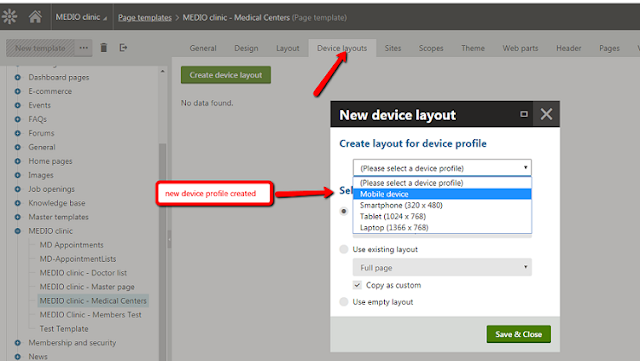
To use this profile, you will need to make use of the Device lay-outs found in the Page Templates. (so that's what this tab is all about?)

Device Lay-out
Use Device Lay-out

Then select to copy the default device profile and just edit it later (for how the lay-out will be)

Then go to the Pages application and select the page where you want the changes will be when viewing different devices. Like if you do not want the menu to be showing in the device profile you created (mobile device). You can adjust the CSS list menu web part and add a macro rule.

using macros for web parts
Using Macros for Web Parts

If you want  to learn more about this feature, you can check-out Kentico's documentation about Developing websites for mobile devices.

On another note, the lay-out mapping found in the Device Profiles looks interesting also. Hmmnn..

March 11, 2019

Learning Kentico: Online Marketing Essentials (the things I love)

by , in
Howdy! Happy Monday everyone! Hope you are all doing well and had a wonderful weekend.

New update for today! I have briefly mentioned in my previous post that I have taken the opportunity to check-out the Online Marketing Essentials course also.

I don't often go to this section in Kentico because most of the support requests I received from our clients are site updates, bug fixes and help request on how to do this and that. So I was surprised to know that there are a lot of very nice features Kentico has developed that any Digital Marketers/Marketing Manager/Sales Manager in a company would surely love or find it very helpful.

Below are just some of the features: 

1. Marketing automation - very useful feature which you will truly love. You can set-up different steps for your marketing emails like if you want to send:

 a. an abandon cart email - email triggered when someone starts to check-out but doesn't finish
 b. browse abandonment email - trigerred when someone on your email lists visits a product on your website but doesn't check-out
 c.  we've missed you email - known as winback campaign, when someone doesn't come back to your store after 60 days or so, so you will send an email with a coupon to bring them back

marketing automaticon
marketing automation

2. Contact Mapping in Forms 
- I haven't noticed this since I was checking forms but it's good to know that there's this feature that you can use for your marketing activity. You can also create custom fields here like if you want to add a Bonjoro (an app you can use to send personalized videos to your contacts/leads). 

contact mapping in forms
Contact Mapping in Forms


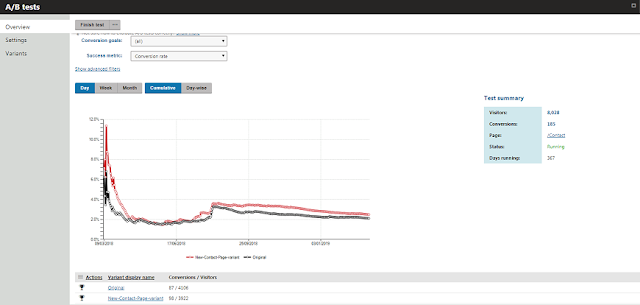
3. A/B Test Feature (both in Pages and in Email Campaigns)
- a great feature that helps you optimize your website's peformance. Tests which will help you see which variants bring the best returns. :)

In Pages application, you can find this in the Analytics tab then select AB Tests.
See results example .

A/B test in Kentico

While for the email campaigns, just go to Email Marketing, select the email feed/campaign you want to test, edit email (click the pencil icon) and create A/B test.

A/B Test in Email Campaigns
Create A/B test in Email Campaigns

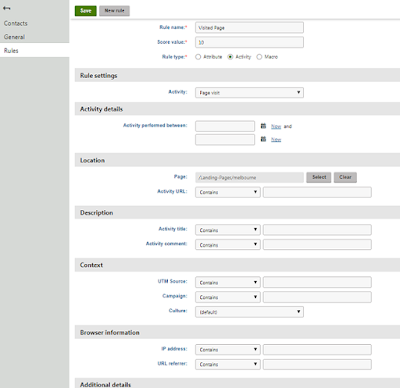
4. Lead Scoring - cool feature to analyze your visitor and identify the customers who are willing to spend money (hottest lead) on your product. :)

You can set-up rules like when they provide email address, considers large purchase and assigned score values. You can recalculate this and view the activity that lead to the scores of your contacts and find the most promising leads. :)

Lead Scoring Kentico Feature
Lead Scoring

I think that's it! Nice features right? Kentico is truly your all-in one CMS, E-commerce and Online Maketing platform. If you want to know more details about this or the rest of the Online Marketing features, why don't you check-out the Kentico's Online Marketing course also. 

Bonus:  Another thing that I learned. When setting up email campaigns using macros and your subscriber didn't provide a first name, this will not look good on your email. So you can set-up a condition to this or a default name like "subscriber".

This can be done by selecting the macro and go to the code tab. Then insert your condition like: IfEmpty(FirstName, "subscriber", firstname). Check-out video below for more :) 


Next, I will review the two developer courses and hopefully resolved the macros exercises. :)
March 06, 2019

Learning Kentico: Content Admin Essentials (the small things)

by , in
Hello March! How are you? 

More than 15 days have passed since my last blog post eh? Yeah, I'ven been focusing reading and learning a lot about Kentico stuff. I checked out their Kentico Advantage site, their webinars (Kentico 10-12) and some other Youtube helpful videos including the tutorial videos prepared by a former colleague. Getting overwhelm with too much information eh? But I'm trying to manage all those stuff.  

And as part of my review and effort so I can really digest all the information. I went back to learning the basics also. I take the opportunity to check-out the Kentico Content Admin Essentials course. Although I'm already familiar with the Kentico Administration interface since version 7 (now it's Kentico 12). I just really wanted to check what's inside it. (if there's something that I missed or didn't know about

And yes, there were small things but important ones that I missed or should I say overlooked or didn't just bother about it before. 

1. The Compare Option in Editing Multilingual content - I didn't know that there's a handy compare option where it easier for you to update changes and you can even compare it horizontallly or vertically. I surely overlooked this feature. I remember I was working on a website of a client before and I was switching back and forth to different cultures. 

compare culture content


2. Anchors in Text Editor - I always get a request to create anchors and I would always do this in the source option. But didn't know that there's actually an anchor feature where you can use when you set the HTML editor toolbar to Full. Hehehe. 

html editor, anchor

3. The colors in the Language Status Overview - when you go to the listing and click on languages, I didn't know that there's meaning to the background colors of those flags in each culture

green -  page is published 
red - page is not published 
orange - published but outdated

language status


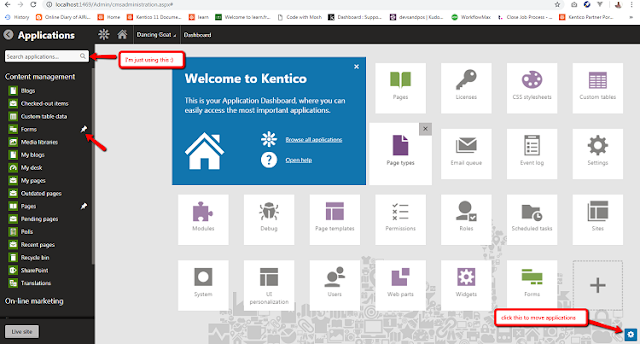
4. The pinning and managing of applications in the Dashboard - yeah this one is very basic, but I didn't really bother about this because I always have the option to search apps in the Dashboard by clicking the Kentico flower or logo (full list of apps)

If you want to configure your dashboard, you can just make use of the pin icon, the gear icon (found at lower right) and drag and drop apps etc. 

Kentico Dashboard

So that's it! But if you are new to Kentico or will be working as an Editor or an Admin I would suggest to really get the Kentico Admin Essentials course. The ones I discussed where my "small things" version only. But inside the course, you will really learned a lot of GREAT STUFF like:

Kentico Administration 
Website Structure 
Editing content 
Storing Files 
Creating New Pages 
Page Design 
Online Forms 
Workflow and Versioning

And their quizzes for each topic? Oh, I really loved them. It's tricky and you will need to be very careful. It would be good if you get the answers the first time. But if not, you can always retry. 


Bonus Small Thing: The Screen Lock 


This one is not discussed in the course but this is very helpful to all editors and admins. You will encounter this screen lock message all the time and quite annoying that you have to always click Cancel. To disable this, just go to Settings -> Security & Membership - Protection and uncheck the Screen lock option. Or you may refer to the screenshot below. :) 

how to disable screenlock in kentico

Next: I will check the Online Marketing Essentials :)


February 13, 2019

Learning Kentico: Component Events

by , in
It's a good day today! Yey! Because I was also able to make the Component Events exercise working. 

At first, I encountered an error that says SelectDoctorEventArgs missing  a directive or assembly reference (screenshot below) 

missing a directive or assembly reference
missing a directive or assembly reference issue

And I tried to search a solution online for that until I saw this Dec 2015 Components article from Kentico Devnet site which is very helpful. He discussed about a common scenario where component events are being used (like in a communication of two webparts in a page), the explanation of the parameters, how it works and some example. 

So I tried to apply it. I have now the two webparts working separately (the doctor's appointment form and the appointment list) but the next challenge is how the two will communicate. I should be able to display the appointment list based on my selection from the doctor dropdown list. 

From that article, I was able to correct or do the ff: 

a. in registering and raising the component events, the component name is the web part id 
b. was able to use the tip that he has provided when using ArgsType method which was my problem (as you see on the first screenshot above)


So I added that in one of code behind of my two web parts, but I couldn't completely remove them because they were 3 errors. I know it's a noob thing to do, but I actually put the custom EventArgs in both of my two web parts. Tsskkkk. yeah right, it doesn't make any sense! And it didn't work. Heheh..so funny! 


And I was thinking, how could I make this like Global? So it brought me back to what I learned/blogged about Global events. Oh yeah, I re-read it - and wait? Sounds like a lot of things to do. I will do the register type of module thingie? No way! Heheheh. 

But good thing, Visual Studio has this bright bulb thingie where it suggested me to why not create a new file for it. So I followed it and everything is now working. Whohoooo! See below: :)

Tried selecting Dr. Queenie Roberts and it displayed the appointment lists for her. 

component events
Displaying appointments for the selected doctor


Checked it also in database and everything is working as expected. :) 

component events
Doctors and Appointment

I know it's just a little accomplishment, but I'm just so happy. I know I still have  A LOT OF LEARN but it feels good. :) I'm going home with a smile on my face. Charot! 

Till my next blog post! 
February 12, 2019

I've finally Get it! (Of Kentico Web Parts & Widgets)

by , in
Oh my gosh! I've finally get it! 

Yesterday, I blogged about not being able to resolve the 2nd exercise for the Web Parts for quite a long time. (The reason why it was still on my draft and why I have opted to study on C# Programming course by Mosh instead - because I was stucked on that exercise ). 

And today, I have finally able to make it work (while I was studying about Macros). Yes, I'm right! As I have predicted it. As you have known, the course will give you reference links or other sources when they discuss a particular topic and it really paid off if you check all of them and study also. 

web parts


It brought me back to review about widgets. I was thinking perhaps I should make the AppointmentList web part to become a widget. And so I did but it is still not showing. Why on earth????

And then I realized as I re-read the instruction: it should be Filter Doctor property only. I added an Appointment list property in the web part before and my query again is incorrect. (Argh! Need to pay attention with this)

web parts

So happy now! Will try the component exercise next and then continue studying Macros. :) 

February 11, 2019

Learning Kentico: Web Parts & Widgets

by , in
Wow!This topic has been on my draft since November 2018 but was never published. So I revisited what I have learned from Web Parts and below are some my notes:

Web Parts
- user controls (.ascx) that needs to inherit from Kentico base classes to ensure that the web part will be properly displayed and that you can manage its properties.

kentico base class,  CMSAbstractWebPart
CMSAbstractWebPart - Kentico base class inherited (for standard listing)

- used on the Design tab of the Pages application
- components that allow you to easily introduce built-in and custom functionality on your website

How to implementing a custom web part?

1. Register web part in web parts application
2. Make sure the web part created inherits to the right/suitable class

Widgets 
- each widget is based on a web part
- needs to be placed inside the widget zones
- called as web parts with hidden properties because this is used by non-technical users (they can only access the important properties but not the advanced properties)


Working with Component Events

- a feature that allows certain parts of the system to communicate.
- One of the most common usages is when you need two or more different web parts to share information.

Types: 
1. request events - fired and survive only within the current request (executed upon each request or page load)
2. global events - fired and survive across during the whole application lifetime (used for complex events that do not depend on single request)

Two Parts:
1. registering an event
2. raising an event

I also learned about these namespaces:
using System.Collections.Generic - used for List
using CMS.Data.Engine = used for Query Operator
using System.Linq = used for ToList

As for the exercises, I couldn't make the 2nd exercise work. I was able to display the list of appointments assigned to a doctor specified in the FilterDoctor web part property.  But I'm confused why it isn't showing in the page. I can't obviously proceed to the third one as it requires a communication between two separate web parts. (Need the contact doctor exercise and appointment list to be on the same page). :(

I'll see in the next lesson (Macros) if I could make it work. I know they are connected. Good luck to me! 
October 22, 2018

Learning Kentico: Scheduled Tasks

by , in
I was supposed to blog this last Friday but I ran out of time. Spent trying to resolve the issues I encounted and was only able to fix it just at the nick of time (before the office closes at 6pm). Whew!

There were quite a few errors I encountered when working with the exercise including the practice example and below are some them:

a. When trying to follow his example about importing products, I couldn't seem to resolve the ERPProductHelper does not exist in the current context issue. I used all the namespace he used but still the same. I couldn't find ERPProductHelper in the Kentico Documentation and tried other solutions but still no luck :(

ERP Product Helper does not exist in the current context
So I just skipped this and didn't include in the project. But if you know how to solve this, feel free to comment below. 

b. The No Definition found for Set Doctors issue. Remember I skipped the 2nd exercise of Kentico API because I got confused with it? In here, I have really no choice but to do it. 

No Set Doctor Method
And I learned that I don't need to modify the previous code generated in the DoctorInfoProvider class which I did in Custom Module exercise and that I only need to add a new public method Set Doctors. And it resolved the no definition issue. :)

c. The next one was File does not exist issue (when I ran the Import Doctor scheduled task)

File does not exist

I couldn't really understand why the file is not found. I've placed it in the App Data folder, created my own folder and placed the Doctor List.csv.

I rechecked all my steps for creating scheduled tasks:

1. Create a new class implementing the CMS.Scheduler.ITask interface - done
2. Add the RegisterCustomClass assembly attribute above the class declaration. - done

 [assembly: RegisterCustomClass("ImportDoctor", typeof(ImportDoctor))]
Import Doctor not found

At first I didn't wrap it in namespace and then tried wrapping it to see if it's fixed the issue because when I reset the executions I got this error above) 

3. Implementation of scheduled task - register it in the Scheduled tasks app and configure the settings (execution interval etc) - done

register scheduled task


I have also asked myself it it has something to do with the Task provider name because mine is only showing custom classes but in his example video, it is showing the name he specified. But nahhh..it's not. 

And you know the culprit? It's because I didn't specify the task data property. Noticed in the above screenshot, the task data field is emptyJaaahhh...he didn't show this on the video. Huhu. Perhaps that part, he didn't just capture it. But at least, I know now. :) Hehe. 

Task Data location

Now import successful! 

scheduled task, import


Till next time! And for reference about Scheduled Task properties. check-out this link
October 09, 2018

Learning Kentico: Global Events

by , in
I'm so happy today! I just finished the Global Events exercise and the took the test with only 1 mistake. :) Yay! (No retakes! Hehe)

For the exercise, it didn't take me that much time compared to the previous ones : Custom Modules and Kentico API . (For Kentico API, I still owe the 2nd exercise. I skipped it because I'm stucked or quite confused. Will get back to it soon.)

For Global Events, here are some of things that I've learned: 

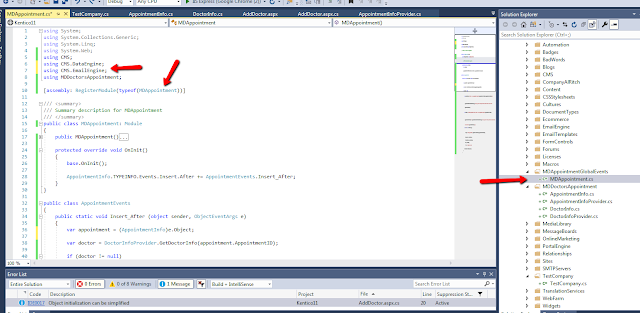
1. It is used to extend the Kentico built-in functionalities and lets you execute custom code based on specific actions (like sending emails to admin when a setting is updated)

2. Learned this important syntax: 

creating handler and events

- where event classes are containers of events and there are sooo many different categories of event classes available (like Object Events, Workflow events etc)

- the event action could be Insert, Update, Delete (more specific ones can be found here as well as their respective event types and handler parameters. :) 

3. Global Events should be created in a custom class and must be placed in the App code. 
- when I was following the sample exercise I was doing it on a separate project so I encountered a lot of assembly or name reference errors. So it really needs to be placed in the App code. 

What else? 

For the actual exercise, I got a bit confused (again) with the name of the Global events that I'm working (so I renamed the folder) and I also forgot to add the email engine reference (but no worries, they are minor issues). 

global events, kentico global events


So tested it by creating a new appointment and the email is already found in the Email Queue. Yay! Still have a long way to go! But I'm just really happy with this progress (though little but still a progress hehehe)

Kentico email queue, global events
October 02, 2018

Learning Kentico: Creating Simple New Info Object and Store Data using InfoProvider (Kentico API)

by , in
Whoah! I'm finally in the exercises section. After a looooonnnngg time!

I've been reading and trying to understand all the topics & subtopics under the Kentico API section (not to mention Object Query, Document Query, Caching etc - nosebleed!) but TODAY I decided to just let it go (No More Excuses! Just Do It!).

And I was able to do it. Finished the first exercise. Weeee..

So, how was it? 

The one that confused me was how can I connect the previous exercises that I did to this? (Create a Doctor Info using Kentico API) because in his example, he was using the built in Kentico user membership module and added a new field and set values to it.

For this exercise, I need to define a DoctorInfo object and populate it with sample firstname, lastname, email etc.

So I created it with the below but got these two errors: Namespace not found & DoctorInfoProvider does not exist in current context. 

namespace reference

I know I have to put something in there at the top as he was using CMS.Membership, but I wasn't sure what to put in there that time. Good thing, that there's a Quick Actions that you can follow. So I use the namespace reference using MDDoctorsAppointment;  but  I got 5 more errors (see below)

no method

That's when I realized that I was just creating my own fields names. It should be the same fieldnames that I use for MDDoctorsAppointment module. Whew!

table field names


Then I added new line to insert the Doctor's info and everything is working now! Yey!
 // Insert doctor
        DoctorInfoProvider.SetDoctorInfo(doctor);


simple Kentico API implementation
June 06, 2018

Learning Kentico: How to Fix SQL Query problems for Custom Tables (Form Control Dropdown List)

by , in
Yey! I'm finally done with Custom Module exercises. I was really stucked with this for weeks/month because everything was new to me. I have to read a lot of info from the documentation and it was really hard to understand. Eventhough I passed all the tests but I don't like to proceed to the next topic if I can't do the exercises. I'm just so happy, I finally did it. 

But before I was able to completely finished it, I encountered two more issues when trying to display the data from the custom table. This is related to SQL query problems in Form Control Dropdown List. See screenshot below: 

Invalid Object Name
Invalid object Name (click image to enlarge)

1. Invalid Object Name
- so for this one, I didn't correctly choose the database table name. I have put the Display name instead.

can't find column, sql query problem
Can't find column 1 (click image to enlarge)

2. Can't find Column 1
- this is because I thought just putting one 'Specialty Name' in the query would be enough.  The correct one/format is  this:

SELECT SpecialtyName, SpecialtyName FROM customtable_doctorspecialty

select query
correct sql query (click to enlarge)

Next would be Kentico API exercises!

Post Top Ad