Showing posts with label Design and Development. Show all posts
January 20, 2025

How to add an entry to the Microsoft Windows hosts file

by , in
Just putting these here in my blog for my notes. :) 

Steps:

  1. Open Notepad as Administrator:

    • Press the Windows key, type Notepad, then right-click on Notepad and select Run as administrator.
    • You must have administrator privileges to edit the hosts file.
  2. Locate the Hosts File:

    • In Notepad, click File > Open.
    • Navigate to the directory:
      C:\Windows\System32\drivers\etc
    • In the File name field, type hosts (if you don't see it, change the file type to "All Files" in the bottom-right dropdown).
  3. Edit the Hosts File:

    • Add a new entry at the bottom of the file in the following format:

    •  [IP Address] [Domain Name] 
                
      For example: 
       127.0.0.1 example.com 
       192.168.1.10 mytest.local
  4. Save the Changes:

    • Press Ctrl + S or click File > Save.
    • If you encounter a permission error, double-check that Notepad was opened as an administrator.

Notes:

  • The hosts file allows you to manually map domain names to IP addresses, overriding DNS lookups.
  • Be careful when editing the file—incorrect entries can disrupt your network or internet access.


Microsoft Windows hosts file

August 02, 2022

Tips For Creating A Good Website For Your Small Business

by , in
When you are starting a small business, one of the most important things you can do is create a good website. This will be your online storefront, and it must look professional and represent your company well. The following blog will discuss some tips for creating a good website for your small business. 

1) Keep It Simple 

When it comes to your website, less is more. You want to create a site that is easy to navigate and understand. Too much information can be overwhelming, and it can turn potential customers away. Stick to the basics and provide only the most essential information about your business

If you have a lot of products or services, consider creating separate pages for each one. This will make your website easier to navigate and will help potential customers find what they are looking for quickly and easily. 

And remember, always proofread your content before publishing! Nothing looks worse than typos or grammatical errors on a website. 

2) Use High-Quality Images 

Images are worth a thousand words, and this is especially true when it comes to websites. Be sure to use high-quality images that accurately represent your business. For example, if you are selling products, consider using photos of the actual items rather than stock photos. People want to see what they are buying! 

And if you don't have any good photos of your own, there are plenty of free stock photo websites out there that you can use. Just be sure to read the terms of use before using any images, as some sites require attribution. 

3) Use Live Chat Software 

One way to set your small business website apart from the competition is to offer live chat support. This can be a great way to build rapport with potential customers and answer any questions they may have in real-time. There are many different live chat software options available, so be sure to do your research on more information on Best Live Chat software for small business

If you cannot offer live chat support 24/hours a day, that's okay! You can still provide chat during regular business hours. This will show potential customers that you're committed to providing excellent customer service. 

4) Optimize Your Site For Search Engines 

If you want people to find your website, you need to make sure it is optimized for search engines. This means using the right keywords and phrases throughout your site so that people can easily find what they are looking for. It also means making sure your site is mobile-friendly and loads quickly. 

Many factors go into search engine optimization, but thankfully there are plenty of resources out there to help you get started. Once you have a basic understanding of SEO, you can start implementing some of these strategies on your own site. 

In conclusion, these are just a few tips for creating a good website for your small business. By following these tips, you can create a professional and user-friendly site that will help you attract new customers and grow your business.
April 04, 2019

Learning Kentico: Alternative Forms

by , in
Just finished with the 2nd developer course (K10) and the last topic was all about Alternative Forms. 

Alternative Forms in Kentico are different versions of existing form lay-outs. 

I first learned about it when I watched the tutorial videos of a former colleague. There were two instances where he applied the Alternative Forms. 

First, in the Form application and the next one was in the Module application. The first one was not a surprised but the second one was like my AHA moments (one of those) also. He went to the Membership classes and edited the CMS_User table and added custom fields and make the other inherited fields hidden. Take note, it is a System Table or Object

Kentico Alternative Forms
Alternative Forms (System Objects)
And today, I learned two other ways where you can create an Alternative Forms. It is in the Page Types and Custom Tables. Cool! And I've seen the code name Filter when I checked an example for the Page types (see below). 

Alternative Forms in Page Types


According to Kentico, if you used that reserved code, the system automatically uses the alternative form that you created. Other code names are Insert, Update and NewCulture. Learn more from here

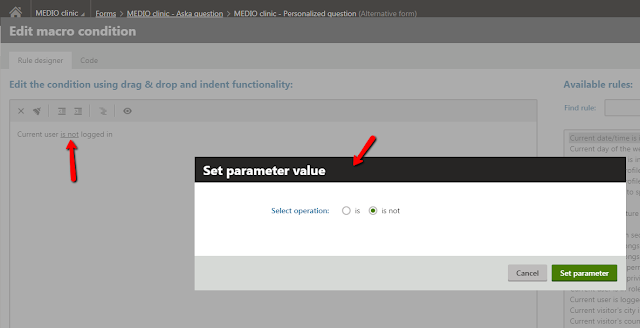
I have yet to try it but for now I just finished the Form Exercise of Creating Alternative Forms. :) I also learned that there's an Enabled condition field in the Advanced settings where you can use a macro condition and set parameter value. 

Kentico macro condition
Macro conditions (set parameter value)

Will continue with my review on the next training course! That's it for today! Short and sweet! Charot! Hehe. :) Happy Thurrrssssssssssday!
April 03, 2019

Learning Kentico: Workflows

by , in
When my employer first bought Kentico training courses, I was not one of those who got access to it. I wondered why. But I said to myself, perhaps he thinks I don't need it. Besides, I'm into Customer Support and I'm quite familiar with Kentico CMS already and I don't need the CMS training. All the more with the Developer's Training because after all, I'm not a developer. Hehe. 

But after a year, I think they see something in me or I showed interest thats why they bought training courses for me. And I'm really thankful for it. So here I am - blogging about my learnings. :)

And Learning Workflows is one of them. I've seen it. I had a discussion with it with a previous developer (back then when he was learning about Kentico) and I got excited to know a bit about it. It's like one of those AHA moment. When you finally know what it is and where it is configured. 

Kentico Workflow
Default Workflow

So for example, you want to create a Workflow where an Editor will review the page's content. You can do this by creating a Basic Workflow. 

1. Go to Configuration-> Workflow-> Create New Workflow 
2. Then Go to Steps -> Create New Workflow steps (like Editor Review) 
3. Then Edit the Step you just created -> Assign Role (like the site administrators will do this)
4. Go to Scope -> Select the Path where the workflow will be applied 

Note: Basic Workflow has default steps already which are Edit, Published and Archived so you'll just need to add the new step. You can apply workflows to individual pages, defined scope of pages or for an entire website. 

Kentico Workflow
Basic Workflow

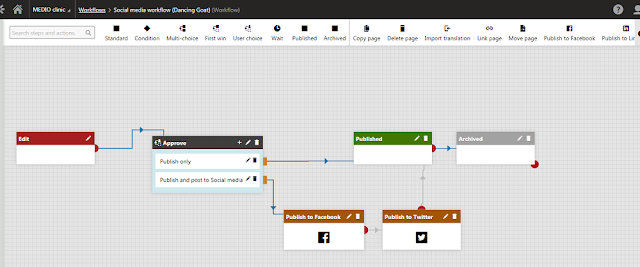
And for today, I learned something more. It's about the Advanced Workflows where there are special type of steps namely: Condition, Multi-choice, First-win, User Choice and Wait. Although I haven't applied them yet or haven't designed my own but I'm already lovin' it (as always, because I love Kentico so much! charot!)

Kentico Advanced Workflow
Advanced Workflow example

Anyway, if you are interested to learn more about Worfklows also, check-out this link
March 27, 2019

Learning Kentico: Linking JavaScript files to pages

by , in
Just a quick post about something I learned new today.

I didn't know that there's  a Javascript web part that you can use to easily link it to your page and this can just be done in the Portal. So cool!

First, you will need to create your own javascript file by going to Development -> Javascript files and click Create. 


create javascript in kentico


Then go to the Page where you want to add a Javascript and select Javascript web part. Click configure web part and in the Linked Javascript section, select the javascript that you just created.

linking javascript file to pages

You also have the option to select where it should be located in a page like in a start up script, beginning of a page and header section. And of course, you  can always add in-line javascript also.
March 22, 2019

Learning Kentico: Device Profiles and Device Lay-outs

by , in
I've finished reviewing the 1st Developer course (K10) last week and now I'm into the 2nd one. 

And yesterday, I learned about Device Profile which is part of the optimizing websites for mobile devices topic. (not discussed in K11 dev course)

It is also something that I always see when using the Preview option and it's good to know more about this adaptive design approach in Kentico. 

Kentico Device Profile
Device Profile

To set-up a new profile
,  just go to Development applications -> Device Profile and supply the necessary fields or add a macro rule like current device max screen size should be between 0 and 768 pixels (width).

Device Profile
Add New Device Profile 
Once done, if you go back to the list of Profiles - you will see a smart tip that the system checks the profiles from Top to Bottom. You can just rearrange this.

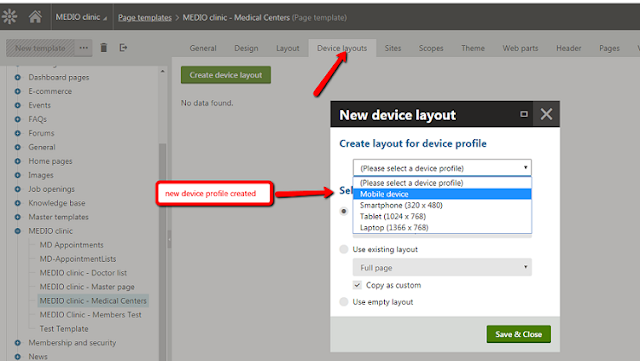
To use this profile, you will need to make use of the Device lay-outs found in the Page Templates. (so that's what this tab is all about?)

Device Lay-out
Use Device Lay-out

Then select to copy the default device profile and just edit it later (for how the lay-out will be)

Then go to the Pages application and select the page where you want the changes will be when viewing different devices. Like if you do not want the menu to be showing in the device profile you created (mobile device). You can adjust the CSS list menu web part and add a macro rule.

using macros for web parts
Using Macros for Web Parts

If you want  to learn more about this feature, you can check-out Kentico's documentation about Developing websites for mobile devices.

On another note, the lay-out mapping found in the Device Profiles looks interesting also. Hmmnn..

March 06, 2019

Learning Kentico: Content Admin Essentials (the small things)

by , in
Hello March! How are you? 

More than 15 days have passed since my last blog post eh? Yeah, I'ven been focusing reading and learning a lot about Kentico stuff. I checked out their Kentico Advantage site, their webinars (Kentico 10-12) and some other Youtube helpful videos including the tutorial videos prepared by a former colleague. Getting overwhelm with too much information eh? But I'm trying to manage all those stuff.  

And as part of my review and effort so I can really digest all the information. I went back to learning the basics also. I take the opportunity to check-out the Kentico Content Admin Essentials course. Although I'm already familiar with the Kentico Administration interface since version 7 (now it's Kentico 12). I just really wanted to check what's inside it. (if there's something that I missed or didn't know about

And yes, there were small things but important ones that I missed or should I say overlooked or didn't just bother about it before. 

1. The Compare Option in Editing Multilingual content - I didn't know that there's a handy compare option where it easier for you to update changes and you can even compare it horizontallly or vertically. I surely overlooked this feature. I remember I was working on a website of a client before and I was switching back and forth to different cultures. 

compare culture content


2. Anchors in Text Editor - I always get a request to create anchors and I would always do this in the source option. But didn't know that there's actually an anchor feature where you can use when you set the HTML editor toolbar to Full. Hehehe. 

html editor, anchor

3. The colors in the Language Status Overview - when you go to the listing and click on languages, I didn't know that there's meaning to the background colors of those flags in each culture

green -  page is published 
red - page is not published 
orange - published but outdated

language status


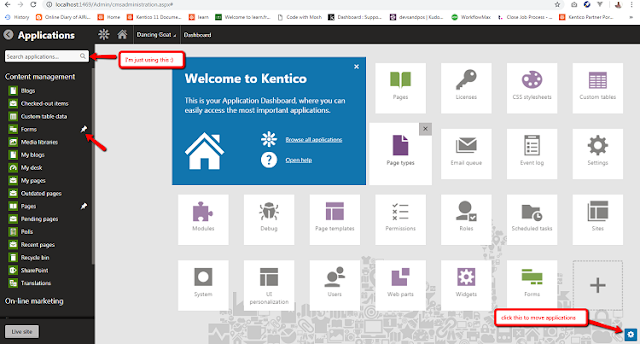
4. The pinning and managing of applications in the Dashboard - yeah this one is very basic, but I didn't really bother about this because I always have the option to search apps in the Dashboard by clicking the Kentico flower or logo (full list of apps)

If you want to configure your dashboard, you can just make use of the pin icon, the gear icon (found at lower right) and drag and drop apps etc. 

Kentico Dashboard

So that's it! But if you are new to Kentico or will be working as an Editor or an Admin I would suggest to really get the Kentico Admin Essentials course. The ones I discussed where my "small things" version only. But inside the course, you will really learned a lot of GREAT STUFF like:

Kentico Administration 
Website Structure 
Editing content 
Storing Files 
Creating New Pages 
Page Design 
Online Forms 
Workflow and Versioning

And their quizzes for each topic? Oh, I really loved them. It's tricky and you will need to be very careful. It would be good if you get the answers the first time. But if not, you can always retry. 


Bonus Small Thing: The Screen Lock 


This one is not discussed in the course but this is very helpful to all editors and admins. You will encounter this screen lock message all the time and quite annoying that you have to always click Cancel. To disable this, just go to Settings -> Security & Membership - Protection and uncheck the Screen lock option. Or you may refer to the screenshot below. :) 

how to disable screenlock in kentico

Next: I will check the Online Marketing Essentials :)


February 13, 2019

Learning Kentico: Component Events

by , in
It's a good day today! Yey! Because I was also able to make the Component Events exercise working. 

At first, I encountered an error that says SelectDoctorEventArgs missing  a directive or assembly reference (screenshot below) 

missing a directive or assembly reference
missing a directive or assembly reference issue

And I tried to search a solution online for that until I saw this Dec 2015 Components article from Kentico Devnet site which is very helpful. He discussed about a common scenario where component events are being used (like in a communication of two webparts in a page), the explanation of the parameters, how it works and some example. 

So I tried to apply it. I have now the two webparts working separately (the doctor's appointment form and the appointment list) but the next challenge is how the two will communicate. I should be able to display the appointment list based on my selection from the doctor dropdown list. 

From that article, I was able to correct or do the ff: 

a. in registering and raising the component events, the component name is the web part id 
b. was able to use the tip that he has provided when using ArgsType method which was my problem (as you see on the first screenshot above)


So I added that in one of code behind of my two web parts, but I couldn't completely remove them because they were 3 errors. I know it's a noob thing to do, but I actually put the custom EventArgs in both of my two web parts. Tsskkkk. yeah right, it doesn't make any sense! And it didn't work. Heheh..so funny! 


And I was thinking, how could I make this like Global? So it brought me back to what I learned/blogged about Global events. Oh yeah, I re-read it - and wait? Sounds like a lot of things to do. I will do the register type of module thingie? No way! Heheheh. 

But good thing, Visual Studio has this bright bulb thingie where it suggested me to why not create a new file for it. So I followed it and everything is now working. Whohoooo! See below: :)

Tried selecting Dr. Queenie Roberts and it displayed the appointment lists for her. 

component events
Displaying appointments for the selected doctor


Checked it also in database and everything is working as expected. :) 

component events
Doctors and Appointment

I know it's just a little accomplishment, but I'm just so happy. I know I still have  A LOT OF LEARN but it feels good. :) I'm going home with a smile on my face. Charot! 

Till my next blog post! 
February 12, 2019

I've finally Get it! (Of Kentico Web Parts & Widgets)

by , in
Oh my gosh! I've finally get it! 

Yesterday, I blogged about not being able to resolve the 2nd exercise for the Web Parts for quite a long time. (The reason why it was still on my draft and why I have opted to study on C# Programming course by Mosh instead - because I was stucked on that exercise ). 

And today, I have finally able to make it work (while I was studying about Macros). Yes, I'm right! As I have predicted it. As you have known, the course will give you reference links or other sources when they discuss a particular topic and it really paid off if you check all of them and study also. 

web parts


It brought me back to review about widgets. I was thinking perhaps I should make the AppointmentList web part to become a widget. And so I did but it is still not showing. Why on earth????

And then I realized as I re-read the instruction: it should be Filter Doctor property only. I added an Appointment list property in the web part before and my query again is incorrect. (Argh! Need to pay attention with this)

web parts

So happy now! Will try the component exercise next and then continue studying Macros. :) 

February 11, 2019

Learning Kentico: Web Parts & Widgets

by , in
Wow!This topic has been on my draft since November 2018 but was never published. So I revisited what I have learned from Web Parts and below are some my notes:

Web Parts
- user controls (.ascx) that needs to inherit from Kentico base classes to ensure that the web part will be properly displayed and that you can manage its properties.

kentico base class,  CMSAbstractWebPart
CMSAbstractWebPart - Kentico base class inherited (for standard listing)

- used on the Design tab of the Pages application
- components that allow you to easily introduce built-in and custom functionality on your website

How to implementing a custom web part?

1. Register web part in web parts application
2. Make sure the web part created inherits to the right/suitable class

Widgets 
- each widget is based on a web part
- needs to be placed inside the widget zones
- called as web parts with hidden properties because this is used by non-technical users (they can only access the important properties but not the advanced properties)


Working with Component Events

- a feature that allows certain parts of the system to communicate.
- One of the most common usages is when you need two or more different web parts to share information.

Types: 
1. request events - fired and survive only within the current request (executed upon each request or page load)
2. global events - fired and survive across during the whole application lifetime (used for complex events that do not depend on single request)

Two Parts:
1. registering an event
2. raising an event

I also learned about these namespaces:
using System.Collections.Generic - used for List
using CMS.Data.Engine = used for Query Operator
using System.Linq = used for ToList

As for the exercises, I couldn't make the 2nd exercise work. I was able to display the list of appointments assigned to a doctor specified in the FilterDoctor web part property.  But I'm confused why it isn't showing in the page. I can't obviously proceed to the third one as it requires a communication between two separate web parts. (Need the contact doctor exercise and appointment list to be on the same page). :(

I'll see in the next lesson (Macros) if I could make it work. I know they are connected. Good luck to me! 
February 08, 2019

How to Fix Restore & Overwrite Database Issue

by , in
I'm making this blog as sort of my repository also for all my learnings in becoming a Web Developer (someday - change career?) so I'll try my best to document those things.

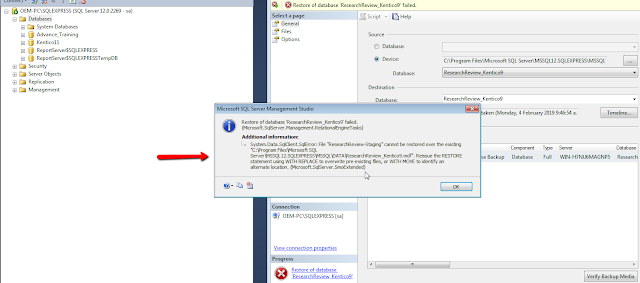
This one is what I encountered just today when trying to restore a database. The error says that the back-up database file cannot be restored over an existing file. (see screenshot below)

database restore failed
(Unable to restore database - click image to enlarge)

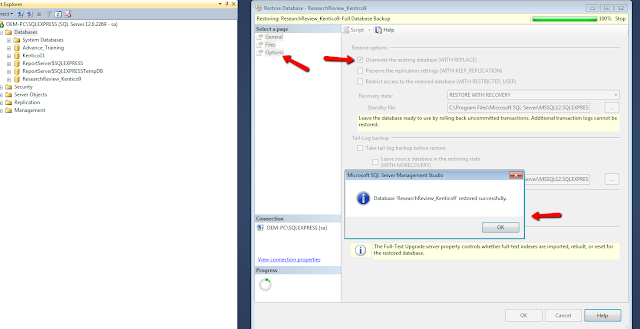
So to fix this, all you need to do is just go to the Options menu and then select the Overwrite to an Existing Database. (screenshot below)

database restored successfully
(Database file restored successfully - click image to enlarge) 

October 22, 2018

Learning Kentico: Scheduled Tasks

by , in
I was supposed to blog this last Friday but I ran out of time. Spent trying to resolve the issues I encounted and was only able to fix it just at the nick of time (before the office closes at 6pm). Whew!

There were quite a few errors I encountered when working with the exercise including the practice example and below are some them:

a. When trying to follow his example about importing products, I couldn't seem to resolve the ERPProductHelper does not exist in the current context issue. I used all the namespace he used but still the same. I couldn't find ERPProductHelper in the Kentico Documentation and tried other solutions but still no luck :(

ERP Product Helper does not exist in the current context
So I just skipped this and didn't include in the project. But if you know how to solve this, feel free to comment below. 

b. The No Definition found for Set Doctors issue. Remember I skipped the 2nd exercise of Kentico API because I got confused with it? In here, I have really no choice but to do it. 

No Set Doctor Method
And I learned that I don't need to modify the previous code generated in the DoctorInfoProvider class which I did in Custom Module exercise and that I only need to add a new public method Set Doctors. And it resolved the no definition issue. :)

c. The next one was File does not exist issue (when I ran the Import Doctor scheduled task)

File does not exist

I couldn't really understand why the file is not found. I've placed it in the App Data folder, created my own folder and placed the Doctor List.csv.

I rechecked all my steps for creating scheduled tasks:

1. Create a new class implementing the CMS.Scheduler.ITask interface - done
2. Add the RegisterCustomClass assembly attribute above the class declaration. - done

 [assembly: RegisterCustomClass("ImportDoctor", typeof(ImportDoctor))]
Import Doctor not found

At first I didn't wrap it in namespace and then tried wrapping it to see if it's fixed the issue because when I reset the executions I got this error above) 

3. Implementation of scheduled task - register it in the Scheduled tasks app and configure the settings (execution interval etc) - done

register scheduled task


I have also asked myself it it has something to do with the Task provider name because mine is only showing custom classes but in his example video, it is showing the name he specified. But nahhh..it's not. 

And you know the culprit? It's because I didn't specify the task data property. Noticed in the above screenshot, the task data field is emptyJaaahhh...he didn't show this on the video. Huhu. Perhaps that part, he didn't just capture it. But at least, I know now. :) Hehe. 

Task Data location

Now import successful! 

scheduled task, import


Till next time! And for reference about Scheduled Task properties. check-out this link
October 09, 2018

Learning Kentico: Global Events

by , in
I'm so happy today! I just finished the Global Events exercise and the took the test with only 1 mistake. :) Yay! (No retakes! Hehe)

For the exercise, it didn't take me that much time compared to the previous ones : Custom Modules and Kentico API . (For Kentico API, I still owe the 2nd exercise. I skipped it because I'm stucked or quite confused. Will get back to it soon.)

For Global Events, here are some of things that I've learned: 

1. It is used to extend the Kentico built-in functionalities and lets you execute custom code based on specific actions (like sending emails to admin when a setting is updated)

2. Learned this important syntax: 

creating handler and events

- where event classes are containers of events and there are sooo many different categories of event classes available (like Object Events, Workflow events etc)

- the event action could be Insert, Update, Delete (more specific ones can be found here as well as their respective event types and handler parameters. :) 

3. Global Events should be created in a custom class and must be placed in the App code. 
- when I was following the sample exercise I was doing it on a separate project so I encountered a lot of assembly or name reference errors. So it really needs to be placed in the App code. 

What else? 

For the actual exercise, I got a bit confused (again) with the name of the Global events that I'm working (so I renamed the folder) and I also forgot to add the email engine reference (but no worries, they are minor issues). 

global events, kentico global events


So tested it by creating a new appointment and the email is already found in the Email Queue. Yay! Still have a long way to go! But I'm just really happy with this progress (though little but still a progress hehehe)

Kentico email queue, global events
October 02, 2018

Learning Kentico: Creating Simple New Info Object and Store Data using InfoProvider (Kentico API)

by , in
Whoah! I'm finally in the exercises section. After a looooonnnngg time!

I've been reading and trying to understand all the topics & subtopics under the Kentico API section (not to mention Object Query, Document Query, Caching etc - nosebleed!) but TODAY I decided to just let it go (No More Excuses! Just Do It!).

And I was able to do it. Finished the first exercise. Weeee..

So, how was it? 

The one that confused me was how can I connect the previous exercises that I did to this? (Create a Doctor Info using Kentico API) because in his example, he was using the built in Kentico user membership module and added a new field and set values to it.

For this exercise, I need to define a DoctorInfo object and populate it with sample firstname, lastname, email etc.

So I created it with the below but got these two errors: Namespace not found & DoctorInfoProvider does not exist in current context. 

namespace reference

I know I have to put something in there at the top as he was using CMS.Membership, but I wasn't sure what to put in there that time. Good thing, that there's a Quick Actions that you can follow. So I use the namespace reference using MDDoctorsAppointment;  but  I got 5 more errors (see below)

no method

That's when I realized that I was just creating my own fields names. It should be the same fieldnames that I use for MDDoctorsAppointment module. Whew!

table field names


Then I added new line to insert the Doctor's info and everything is working now! Yey!
 // Insert doctor
        DoctorInfoProvider.SetDoctorInfo(doctor);


simple Kentico API implementation
September 14, 2018

Keep Your Brand Consistent At All Times

by , in
Anyone involved in setting up their own business needs to make sure that they are well aware of branding - how to build a brand that makes sense, how to make sure it works, and so on. But if you have never had to do this before, you are likely to run into more than a few problems early on into the process. One of the most common problems here is that if trying to keep the brand consistent at all times. Achieving proper brand consistency can take a great deal of time, and effort, and understanding which you might not already have by proxy. In this article, we will look into some of the things you can do to ensure that your brand is kept truly consistent at all times. 

design, brands

Keep Everyone In The Loop 

Firstly, you need to make sure that you are doing whatever you can to keep everyone who has anything to do with the branding in the loop. That means having regular meetings with them, posting memos whenever there is a change, even a small or seemingly insignificant change, and generally ensuring that nobody is left in the dark as to what is trying to be achieved with the branding. The most common failure here stems from a lack of understanding about who you actually need to inform and keep up to date. You might be surprised at just how many people need to know about the branding, and how far down the chain it goes. Prepare yourself for that, and you are going to find yourself in a much stronger position. 

Use DAM 

One of the most powerful ways to ensure that there are none of those missteps with regard to your brand consistency is to use DAM. If you are wondering: What is DAM? You are not alone, as many people have barely even heard of this highly useful way of dealing with branding. Short for Digital Asset Management, it actually stems far beyond mere branding, but this is still one of its most common and likely uses for most businesses. Using a DAM system, you can easily upload, share, and create content for your brand. This is done in such a way that it keeps it consistent basically automatically, and it ensures that there are not likely to be many errors of consistency based on human error. 

design, brands, consistency

Keep It Simple 

Remember too that it is much easier to keep a brand consistent if it is as simple as possible. Not only that, but simplicity is also a much better way of ensuring that the brand is actually going to have a truly powerful effect, as it is much more likely to stick in people's minds anyway. So if you manage to keep it simple, you are actually going to do yourself a number of favours in one go. If you struggle to keep it simple, just put some time and effort into paring it down a little. You should be able to find that you can relatively easily strip it down to its essentials this way.
June 22, 2018

Everything You Need To Know About Business Software

by , in
programming, coding
Source: pxhere

In my eyes, every business should use at least one piece of computer software. Whether it’s something to manage your expenses, or a system that keeps consumer information tucked safely away - the bottom line is; software is useful. 

Saying that, there is a lot to think about before you go out and get some business software. It’s not just a case of buying the first thing you see, there’s more to it than that. As such, I’ve put together a guide that will help you understand everything there is to know about getting your hands on business software

Developing Custom Software 


Instead of going out and downloading existing software, you could build your own. Why would you do this? It sounds time-consuming, expensive, and the overall worst option out of the two. There are lots of little reasons this may seem like an attractive prospect to you, but the main one is this; it’s software that’s unique to your business. 

In turn, this means you have something that’s designed to work for a specific purpose. There’s no need to worry about loads of extra features that may be available on other software downloads, which you will never use. Not only that, but you’ve got something that’s easier for you to manage and maintain. When problems occur, you can deal with them quickly because you haven’t got to contact a customer service team to help sort them out. 

As for the time-consuming and expensive worries, these aren’t as bad as you originally perceive. Most people assume you need to hire a software development team, but you can easily just outsource proceedings to another company. Or, a more popular idea is the concept of a software development team extension. This is where you have a small and affordable team in your office, but you get the help of another business to act as an extension of your team. Doing this allows you to speed up productivity, without having to spend too much money. Plus, it’s arguably better than outsourcing as some of the team work on your premises, so you have easy contact methods. 

Is custom software development the right path for you to proceed down? This depends; do you want to create some software applications that are unique to your business? A lot of companies may find they have everything they need in existing software so this wouldn’t be necessary for them. If your business fits the category of a company that requires its own software as nothing else is working well for you, then go for it. 

coding, programming
Source: pixnio

Purchasing Existing Software 


The next thing to cover is buying software that already exists. This is a popular method for many, as it’s seen as the quickest and easiest way to do things. Instead of taking on the burden of software development yourself, you simply search for something that’s already been developed by a different company. 

As alluded to earlier, the main drawback of this is that some software comes with almost too many features. This makes it hard for you and your team to understand, leading to a lengthy learning period. Or, you may have features on there that just are never going to be used. It means you end up with a bloated piece of software that you feel like you’re not getting the most out of. As a result, it can kind of feel like you’re wasting money by not seeing its full potential. 

But, purchasing existing software has the benefit of coming with reviews. You can see what other businesses think about this software, and whether or not it will indeed help your company. There are loads of examples of business software that so many companies download and use. Quickbooks is just the first one that springs to mind; it’s bookkeeping software for businesses. Loads or organizations find it useful to manage their books, and so on. It’s also a lot cheaper to buy software that already exists, and you can have it on your desktop in seconds. 

There are a few pieces of advice I have surrounding this topic. Firstly, I suggest you always buy the software directly from the developer's website. This gives you confidence that you’ve spent money on something that’s a) genuine, and b) not riddled with viruses. As tempting as it is to buy a free version from a dodgy site, you should always support developers and pay for it. Secondly, do your research and find the best software for your needs. Price should be no object, as this is an investment more than an expense. Let’s say you spend $300 on software, it seems like a lot, but you now own that software forever, so it’s still great value. 

Combining The Two 


At this point in the article you’re probably thinking; hang on, what if I wanted to do both these things? That’s a very good point, you can easily combine both methods when it suits you. In fact, this is the recommended thing to do! 

There are times where you might need a custom piece of software because nothing out there is ticking all the right boxes for your business. So, you can still develop this and then use existing software for other business processes. It’s rare to see a company that uses completely custom software for everything. Granted, many will only use existing software, but I think a combination can work well in the right scenarios. 
The key is figuring out when you benefit more from custom software compared to existing software. 

calculator
Source: Max Pixel

Managing Your Budget 


Of course, the final thing to talk about is your budget. No matter if you develop the software yourself, or you’re buying it online; it still costs money. Always ensure that you’re managing your budget and only spending what you can afford. 

I know this sounds contradictory to what I said earlier about money being no object when you purchase the software. What I really meant was that you should set a budget and then go on your hunt for the right product. As long as everything fits your budget, then the price doesn’t matter as you can afford it. 

The same obviously goes for custom development. Whether you’re hiring an entire team, outsourcing; whatever, make sure you have a budget drawn up. Calculate the cost of developing the software before you go out and do it. Heck, you may find it's way out of your league, in which case you’ll have to just buy software anyway! 

Business Software: A Summary 


So, to summarize everything; business software is both essential and beneficial. There are loads of different types out there, but they’re all designed to help you improve your business processes. This could mean speeding things up, getting rid of errors, improving efficiency, helping you stick to deadlines, and so on. 

Next, if you want to get your hands on some business software, then you have two options; develop it yourself or buy it online. Either option can work well for you, it all depends on the software you’re interested in using. If you choose to develop it, then you’ll need to find talented individuals to do this, either by hiring them, outsourcing, or both! 

When buying software, be careful to always go to the official site so avoid downloading anything dodgy and teeming with malware. Similarly, do as much research as possible to ensure you get the best software for your needs. If all the reviews for something are negative, it’s probably not worth buying. 

I hope this post has helped you understand business software and the options available for your business. If you want to run an efficient and productive business, then get your hands on the right software today.
June 06, 2018

Learning Kentico: How to Fix SQL Query problems for Custom Tables (Form Control Dropdown List)

by , in
Yey! I'm finally done with Custom Module exercises. I was really stucked with this for weeks/month because everything was new to me. I have to read a lot of info from the documentation and it was really hard to understand. Eventhough I passed all the tests but I don't like to proceed to the next topic if I can't do the exercises. I'm just so happy, I finally did it. 

But before I was able to completely finished it, I encountered two more issues when trying to display the data from the custom table. This is related to SQL query problems in Form Control Dropdown List. See screenshot below: 

Invalid Object Name
Invalid object Name (click image to enlarge)

1. Invalid Object Name
- so for this one, I didn't correctly choose the database table name. I have put the Display name instead.

can't find column, sql query problem
Can't find column 1 (click image to enlarge)

2. Can't find Column 1
- this is because I thought just putting one 'Specialty Name' in the query would be enough.  The correct one/format is  this:

SELECT SpecialtyName, SpecialtyName FROM customtable_doctorspecialty

select query
correct sql query (click to enlarge)

Next would be Kentico API exercises!

Post Top Ad